Введение в работу с библиотекой requests в python
Содержание:
- Наш первый запрос
- Quick Overview of HTTP Requests
- Python requests upload image
- Объект Response
- Коды состояния ответа
- PHP GET request in Symfony
- Python requests post value
- Заголовки
- Retrieving definitions from a dictionary
- Наш первый запрос
- User agent
- Examples
- Python Tutorial
- urllib.request Restrictions
- HTTP-коды состояний
- HTTP status codes
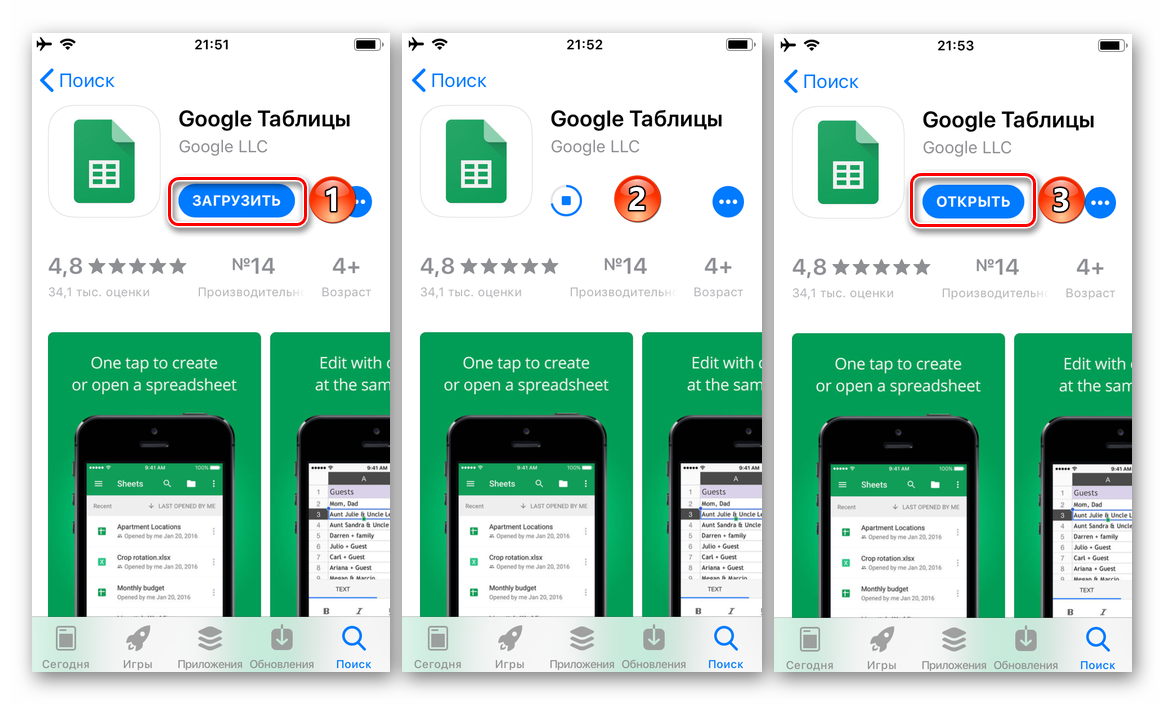
Наш первый запрос
Для начала используем библиотеку Python Requests для чего-то простого: отправим запрос на сайт Scotch.io. Создайте файл script.py и добавьте в него приведенный ниже код.
import requests

res = requests.get('https://scotch.io')

print(res)
Приведенный выше код отправляет запрос GET на Scotch.io. Это тот же тип запроса, который браузер отправляет для просмотра веб-страницы. Отличие заключается в том, что эти запросы не могут передать HTML. Поэтому вместо него приходит необработанный HTML и другая информация из ответа, предоставленного сервером.
В данном случае мы используем функцию .get(). Но библиотека Requests содержит и другие подобные функции: .post() и .put().
Запустите файл script.py.
python script.py
В ответ придет следующее:
Quick Overview of HTTP Requests
HTTP requests are how the web works. Every time you navigate to a web page, your browser makes multiple requests to the web page’s server. The server then responds with all the data necessary to render the page, and your browser then actually renders the page so you can see it.
The generic process is this: a client (like a browser or Python script using Requests) will send some data to a URL, and then the server located at the URL will read the data, decide what to do with it, and return a response to the client. Finally, the client can decide what to do with the data in the response.
Part of the data the client sends in a request is the request method. Some common request methods are GET, POST, and PUT. GET requests are normally for reading data only without making a change to something, while POST and PUT requests generally are for modifying data on the server. So for example, the Stripe API allows you to use POST requests to create a new charge so a user can purchase something from your app.
This article will cover GET requests only because we won’t be modifying any data on a server.
When sending a request from a Python script or inside a web app, you, the developer, gets to decide what gets sent in each request and what to do with the response. So let’s explore that by first sending a request to Scotch.io and then by using a language translation API.
Python requests upload image
In the following example, we are going to upload an image. We create
a web application with Flask.
app.py
#!/usr/bin/env python3

import os
from flask import Flask, request

app = Flask(__name__)

@app.route("/")
def home():
    return 'This is home page'

@app.route("/upload", methods=)
def handleFileUpload():

    msg = 'failed to upload image'

    if 'image' in request.files:

        photo = request.files

        if photo.filename != '':

            photo.save(os.path.join('.', photo.filename))
            msg = 'image uploaded successfully'

    return msg

if __name__ == '__main__':
    app.run()
This is a simple application with two endpoints. The
endpoint checks if there is some image and saves it to the current directory.
upload_file.py
#!/usr/bin/env python3

import requests as req

url = 'http://localhost:5000/upload'

with open('sid.jpg', 'rb') as f:

    files = {'image': f}

    r = req.post(url, files=files)
    print(r.text)
We send the image to the Flask application. The file is specified
in the attribute of the method.
Объект Response
Response — это объект для проверки результатов запроса.
Давайте сделаем тот же запрос, но на этот раз сохраним его в переменную, чтобы мы могли более подробно изучить его атрибуты и поведение:
В этом примере вы захватили значение, возвращаемое значение , которое является экземпляром Response, и сохранили его в переменной response. Название переменной может быть любым.
Код ответа HTTP
Первый кусок данных, который можно получить из ответа — код состояния (он же код ответа HTTP). Код ответа информирует вас о состоянии запроса.
Например, статус означает, что ваш запрос был успешно выполнен, а статус означает, что ресурс не найден. Есть множество других ответов сервера, которые могут дать вам информацию о том, что произошло с вашим запросом.
Используя вы можете увидеть статус, который вернул вам в ответ сервер:
вернул 200 — это значит, что запрос успешно выполнен и сервер отдал вам запрашиваемые данные.
Иногда эту информацию можно использовать в коде для принятия решений:
Если сервер возвращает 200, то программа выведет , если код ответа 400, то программа выведет .
Requests делает еще один шаг к тому, чтобы сделать это проще. Если вы используете экземпляр Response в условном выражении, то он получит значение , если код ответа между 200 и 400, и False во всех остальных случаях.
Поэтому вы можете сделать проще последний пример, переписав :
Помните, что этот метод не проверяет, что код состояния равен 200.
Причиной этого является то, что ответы с кодом в диапазоне от 200 до 400, такие как и , тоже считаются истинными, так как они дают некоторый обрабатываемый ответ.
Например, статус 204 говорит о том, что запрос был успешным, но в теле ответа нет содержимого.
Поэтому убедитесь, что вы используете этот сокращенный вид записи, только если хотите узнать был ли запрос успешен в целом. А затем обработать код состояния соответствующим образом.
Если вы не хотите проверять код ответа сервера в операторе , то вместо этого вы можете вызвать исключение, если запрос был неудачным. Это можно сделать вызвав :
Если вы используете , то HTTPError сработает только для определенных кодов состояния. Если состояние укажет на успешный запрос, то исключение не будет вызвано и программа продолжит свою работу.
Теперь вы знаете многое о том, что делать с кодом ответа от сервера. Но когда вы делаете GET-запрос, вы редко заботитесь только об ответе сервера — обычно вы хотите увидеть больше.
Далее вы узнаете как просмотреть фактические данные, которые сервер отправил в теле ответа.
Content
Ответ на Get-запрос, в теле сообщения часто содержит некую ценную информацию, известную как «полезная нагрузка» («Payload»). Используя атрибуты и методы Response, вы можете просматривать payload в разных форматах.
Чтобы увидеть содержимое ответа в байтах, используйте :
Пока дает вам доступ к необработанным байтам полезной нагрузки ответа, вы можете захотеть преобразовать их в строку с использованием кодировки символов UTF-8. Response это сделает за вас, когда вы укажите :
Поскольку для декодирования байтов в строки требуется схема кодирования, Requests будет пытаться угадать кодировку на основе заголовков ответа. Вы можете указать кодировку явно, установив перед указанием :
Если вы посмотрите на ответ, то вы увидите, что на самом деле это последовательный JSON контент. Чтобы получить словарь, вы можете взять строку, которую получили из и десериализовать ее с помощью . Однако, более простой способ сделать это — использовать .
Тип возвращаемого значения — это словарь, поэтому вы можете получить доступ к значениям в объекте по ключу.
Вы можете делать многое с кодом состояний и телом сообщений. Но если вам нужна дополнительная информация, такая как метаданные о самом ответе, то вам нужно взглянуть на заголовки ответа.
Заголовки
Заголовки ответа могут дать вам полезную информацию, такую как тип ответа и ограничение по времени, в течение которого необходимо кэшировать ответ.
Чтобы посмотреть заголовки, укажите :
возвращает похожий на словарь объект, позволяющий получить доступ к значениям объекта по ключу. Например, чтобы получить тип содержимого ответа, вы можете получить доступ к Content-Type:
Используя ключ или — вы получите одно и то же значение.
Теперь вы узнали основное о Response. Вы увидели его наиболее используемые атрибуты и методы в действии. Давайте сделаем шаг назад и посмотрим как изменяются ответы при настройке Get-запросов.
Коды состояния ответа
Мы можем проверить код состояния ответа:
>>> r = requests.get('http://httpbin.org/get')
>>> r.status_code
200
Для удобства также поставляется со встроенным объектом подстановок кодов состояния:
>>> r.status_code == requests.codes.ok
True
Если мы сделали плохой запрос (ошибка клиента или ошибка ответа сервера), то мы можем возбудить исключение с помощью :
>>> bad_r = requests.get('http://httpbin.org/status/404')
>>> bad_r.status_code
404
>>> bad_r.raise_for_status()
Traceback (most recent call last):
  File "requests/models.py", line 832, in raise_for_status
    raise http_error
requests.exceptions.HTTPError: 404 Client Error
Traceback (most recent call last):
  File "requests/models.py", line 832, in raise_for_status
    raise http_error
requests.exceptions.HTTPError: 404 Client Error
Но если status_code для оказался , то когда мы вызываем мы получаем:
>>> r.raise_for_status()
None
Это значит, что все в порядке.
PHP GET request in Symfony
In the following example, we process a GET request in a Symfony application.
$ symfony new symreq
$ cd symreq
A new application is created.
$ composer req annot
$ composer req maker --dev
We install the and components.
$ php bin/console make:controller HomeController
We create a new controller.
src/Controller/HomeController.php
<?php

namespace App\Controller;

use Symfony\Bundle\FrameworkBundle\Controller\AbstractController;
use Symfony\Component\Routing\Annotation\Route;
use Symfony\Component\HttpFoundation\Response;
use Symfony\Component\HttpFoundation\Request;

class HomeController extends AbstractController
{
    /**
     * @Route("/", name="home", methods={"GET"})
     */
    public function index(Request $request): Response
    {
        $name = $request->query->get('name', 'guest');
        $message = $request->query->get('message', 'hello there');

        $output = "$name says: $message";

        return new Response($output, Response::HTTP_OK,
            ['content-type' => 'text/plain']);
    }
}
Inside the method,
we get the query parameters and create a response.
$name = $request->query->get('name', 'guest');
The GET parameter is retrieved with .
The second parameter of the method is a default value which is used when no
value was retrieved.
$ symfony serve
We start the server.
$ curl 'localhost:8000/?name=Lucia&message=Cau'
Lucia says: Cau
We generate a GET request with curl.
Python requests post value
The method dispatches a POST request on the given
URL, providing the key/value pairs for the fill-in form content.
post_value.py
#!/usr/bin/env python3

import requests as req

data = {'name': 'Peter'}

resp = req.post("https://httpbin.org/post", data)
print(resp.text)
The script sends a request with a key having value.
The POST request is issued with the method.
$ ./post_value.py
{
  "args": {},
  "data": "",
  "files": {},
  "form": {
    "name": "Peter"
  },
  "headers": {
    "Accept": "*/*",
    "Accept-Encoding": "gzip, deflate",
    "Content-Length": "10",
    "Content-Type": "application/x-www-form-urlencoded",
    "Host": "httpbin.org",
    "User-Agent": "python-requests/2.21.0"
  },
  "json": null,
  ...
}
This is the output of the script.
Заголовки
Также в ответе вы можете получить заголовки. Вы можете посмотреть их, используя словарь headers для объекта response.
script.py
Заголовки отправляются вместе с запросом и возвращаются с ответом. Заголовки используются для того, чтобы клиент и сервер понимали, как интерпретировать данные, отправляемые и получаемые в запросе и ответе.
Мы увидим в ответе несколько заголовков. Обычно информация из заголовков не требуется, однако если она вам нужна, вы можете ее получить.
Обычно требуется заголовок content type, поскольку он показывает формат данных, например HTML, JSON, PDF, обычный текст и т. д. Однако заголовок content type обрабатывается библиотекой Requests, и вы имеете доступ ко всем возвращаемым данным.
Retrieving definitions from a dictionary
In the following example, we find definitions of a term
on the www.dictionary.com.
To parse HTML, we use the module.
$ pip install lxml
We install the module with
the tool.
get_term.py
#!/usr/bin/env python3

import requests as req
from lxml import html
import textwrap

term = "dog"

resp = req.get("http://www.dictionary.com/browse/" + term)
root = html.fromstring(resp.content)

for sel in root.xpath("//span"):

    if sel.text:

        s = sel.text.strip()

        if (len(s) > 3):

            print(textwrap.fill(s, width=50))
In this script, we find the definitions of the term dog on .
The module is used to parse the HTML code.
Note: The tags that contain the definitions may change overnight.
In such case we would need to adapt the script.
from lxml import html
The module can be used to parse HTML.
import textwrap
The module is used to wrap text to a certain width.
resp = req.get("http://www.dictionary.com/browse/" + term)
To perform a search, we append the term at the end of the URL.
root = html.fromstring(resp.content)
We need to use rather than
because implicitly expects bytes as input.
(The returns content in bytes whereas
as Unicode text.
for sel in root.xpath("//span"):

    if sel.text:

        s = sel.text.strip()

        if (len(s) > 3):

            print(textwrap.fill(s, width=50))
We parse the content. The main definitions are located inside the tag, which
has the attribute.
We improve the formatting by removing excessive white space and stray
characters. The text width has maximum of 50 characters. Note that such parsing
is subject to change.
$ ./get_term.py
a domesticated canid,
any carnivore of the dog family Canidae, having
prominent canine teeth and, in the wild state, a
long and slender muzzle, a deep-chested muscular
body, a bushy tail, and large, erect ears.
...
This is a partial list of the definitions.
Наш первый запрос
Для начала мы используем библиотеку Requests для отправки запроса на сайт Scotch.io. Создайте файл с именем и добавьте в него следующий код. В этой статье мы рассматриваем небольшое количество кода, поэтому если что-то изменится, вы можете просто обновить существующий код вместо добавления новых строк.
script.py
Этот код просто отправляет запрос GET на сайт Scotch.io. Это такой же тип запроса, какой используется вашим браузером для просмотра этой страницы, и единственное отличие заключается в том, что библиотека Requests не может выполнить рендеринг кода HTML, и поэтому вы получите просто код HTML и другую информацию, содержащуюся в ответе.
Здесь мы используем функцию , однако Requests также позволяет использовать при отправке запросов и другие функции, в том числе и .
Для отправки запроса нужно запустить файл script.py.
Вот что вы получите в результате: запуск .
User agent
In this section, we specify the name of the user agent. We create our
own Python HTTP server.
http_server.py
#!/usr/bin/env python3

from http.server import BaseHTTPRequestHandler, HTTPServer

class MyHandler(BaseHTTPRequestHandler):

    def do_GET(self):

        message = "Hello there"

        self.send_response(200)

        if self.path == '/agent':

            message = self.headers

        self.send_header('Content-type', 'text/html')
        self.end_headers()

        self.wfile.write(bytes(message, "utf8"))

        return


def main():

    print('starting server on port 8081...')

    server_address = ('127.0.0.1', 8081)
    httpd = HTTPServer(server_address, MyHandler)
    httpd.serve_forever()

main()
We have a simple Python HTTP server.
if self.path == '/agent':

    message = self.headers
If the path contains , we return
the specified user agent.
user_agent.py
#!/usr/bin/env python3

import requests as req

headers = {'user-agent': 'Python script'}

resp = req.get("http://localhost:8081/agent", headers=headers)
print(resp.text)
This script creates a simple GET request to our Python HTTP server.
To add HTTP headers to a request, we pass in a dictionary to the
parameter.
headers = {'user-agent': 'Python script'}
The header values are placed in a Python dictionary.
resp = req.get("http://localhost:8081/agent", headers=headers)
The values are passed to the parameter.
$ simple_server.py
starting server on port 8081...
First, we start the server.
$ ./user_agent.py
Python script
Then we run the script. The server responded with the name of the agent that we
have sent with the request.
Examples
Here is an example session that uses the method:
>>> import http.client
>>> conn = http.client.HTTPSConnection("www.python.org")
>>> conn.request("GET", "/")
>>> r1 = conn.getresponse()
>>> print(r1.status, r1.reason)
200 OK
>>> data1 = r1.read()  # This will return entire content.
>>> # The following example demonstrates reading data in chunks.
>>> conn.request("GET", "/")
>>> r1 = conn.getresponse()
>>> while chunk := r1.read(200):
...     print(repr(chunk))
b'<!doctype html>\n<!--[if"...
...
>>> # Example of an invalid request
>>> conn = http.client.HTTPSConnection("docs.python.org")
>>> conn.request("GET", "/parrot.spam")
>>> r2 = conn.getresponse()
>>> print(r2.status, r2.reason)
404 Not Found
>>> data2 = r2.read()
>>> conn.close()
Here is an example session that uses the method. Note that the
method never returns any data.
>>> import http.client
>>> conn = http.client.HTTPSConnection("www.python.org")
>>> conn.request("HEAD", "/")
>>> res = conn.getresponse()
>>> print(res.status, res.reason)
200 OK
>>> data = res.read()
>>> print(len(data))

>>> data == b''
True
Here is an example session that shows how to requests:
>>> import http.client, urllib.parse
>>> params = urllib.parse.urlencode({'@number' 12524, '@type' 'issue', '@action' 'show'})
>>> headers = {"Content-type" "application/x-www-form-urlencoded",
...            "Accept" "text/plain"}
>>> conn = http.client.HTTPConnection("bugs.python.org")
>>> conn.request("POST", "", params, headers)
>>> response = conn.getresponse()
>>> print(response.status, response.reason)
302 Found
>>> data = response.read()
>>> data
b'Redirecting to <a href="http://bugs.python.org/issue12524">http://bugs.python.org/issue12524</a>'
>>> conn.close()
Client side requests are very similar to requests. The
difference lies only the server side where HTTP server will allow resources to
be created via request. It should be noted that custom HTTP methods
are also handled in by setting the appropriate
method attribute. Here is an example session that shows how to send a
request using http.client:
Python Tutorial
Python HOMEPython IntroPython Get StartedPython SyntaxPython CommentsPython Variables
Python Variables
Variable Names
Assign Multiple Values
Output Variables
Global Variables
Variable Exercises
Python Data TypesPython NumbersPython CastingPython Strings
Python Strings
Slicing Strings
Modify Strings
Concatenate Strings
Format Strings
Escape Characters
String Methods
String Exercises
Python BooleansPython OperatorsPython Lists
Python Lists
Access List Items
Change List Items
Add List Items
Remove List Items
Loop Lists
List Comprehension
Sort Lists
Copy Lists
Join Lists
List Methods
List Exercises
Python Tuples
Python Tuples
Access Tuples
Update Tuples
Unpack Tuples
Loop Tuples
Join Tuples
Tuple Methods
Tuple Exercises
Python Sets
Python Sets
Access Set Items
Add Set Items
Remove Set Items
Loop Sets
Join Sets
Set Methods
Set Exercises
Python Dictionaries
Python Dictionaries
Access Items
Change Items
Add Items
Remove Items
Loop Dictionaries
Copy Dictionaries
Nested Dictionaries
Dictionary Methods
Dictionary Exercise
Python If…ElsePython While LoopsPython For LoopsPython FunctionsPython LambdaPython ArraysPython Classes/ObjectsPython InheritancePython IteratorsPython ScopePython ModulesPython DatesPython MathPython JSONPython RegExPython PIPPython Try…ExceptPython User InputPython String Formatting
urllib.request Restrictions
-
Currently, only the following protocols are supported: HTTP (versions 0.9 and
1.0), FTP, local files, and data URLs.Changed in version 3.4: Added support for data URLs.
-
The caching feature of has been disabled until someone
finds the time to hack proper processing of Expiration time headers. -
There should be a function to query whether a particular URL is in the cache.
-
For backward compatibility, if a URL appears to point to a local file but the
file can’t be opened, the URL is re-interpreted using the FTP protocol. This
can sometimes cause confusing error messages. -
The and functions can cause arbitrarily
long delays while waiting for a network connection to be set up. This means
that it is difficult to build an interactive Web client using these functions
without using threads. -
The data returned by or is the raw data
returned by the server. This may be binary data (such as an image), plain text
or (for example) HTML. The HTTP protocol provides type information in the reply
header, which can be inspected by looking at the Content-Type
header. If the returned data is HTML, you can use the module
to parse it. -
The code handling the FTP protocol cannot differentiate between a file and a
directory. This can lead to unexpected behavior when attempting to read a URL
that points to a file that is not accessible. If the URL ends in a , it is
assumed to refer to a directory and will be handled accordingly. But if an
attempt to read a file leads to a 550 error (meaning the URL cannot be found or
is not accessible, often for permission reasons), then the path is treated as a
directory in order to handle the case when a directory is specified by a URL but
the trailing has been left off. This can cause misleading results when
you try to fetch a file whose read permissions make it inaccessible; the FTP
code will try to read it, fail with a 550 error, and then perform a directory
listing for the unreadable file. If fine-grained control is needed, consider
using the module, subclassing , or changing
_urlopener to meet your needs.
HTTP-коды состояний
Первые данные, которые мы получим посредством Response, будут коды состояния. Они сообщают о статусе нашего запроса.
К примеру, статус 200 OK означает, что запрос был успешно выполнен. А известная всем ошибка 404 NOT FOUND скажет нам, что запрашиваемый ресурс найден не был. Таких статусных информационных кодов существует довольно много.
Давайте с помощью .status_code, увидим код состояния, возвращаемый с сервера.
    >>> response.status_code
200
В нашем случае .status_code вернул 200, что означает успешно выполненный запрос.
Кстати, иногда полученная информация используется при написании кода:
    if response.status_code == 200
    print('Success!')
elif response.status_code == 404
    print('Not Found.')
HTTP status codes
Supported,
IANA-registered
status codes available in are:
|
Code |
Enum Name |
Details |
|---|---|---|
|
HTTP/1.1 RFC 7231, Section 6.2.1 |
||
|
HTTP/1.1 RFC 7231, Section 6.2.2 |
||
|
WebDAV RFC 2518, Section 10.1 |
||
|
An HTTP Status Code for Indicating Hints RFC 8297 |
||
|
HTTP/1.1 RFC 7231, Section 6.3.1 |
||
|
HTTP/1.1 RFC 7231, Section 6.3.2 |
||
|
HTTP/1.1 RFC 7231, Section 6.3.3 |
||
|
HTTP/1.1 RFC 7231, Section 6.3.4 |
||
|
HTTP/1.1 RFC 7231, Section 6.3.5 |
||
|
HTTP/1.1 RFC 7231, Section 6.3.6 |
||
|
HTTP/1.1 RFC 7233, Section 4.1 |
||
|
WebDAV RFC 4918, Section 11.1 |
||
|
WebDAV Binding Extensions RFC 5842, Section 7.1 (Experimental) |
||
|
Delta Encoding in HTTP RFC 3229, Section 10.4.1 |
||
|
HTTP/1.1 RFC 7231, Section 6.4.1 |
||
|
HTTP/1.1 RFC 7231, Section 6.4.2 |
||
|
HTTP/1.1 RFC 7231, Section 6.4.3 |
||
|
HTTP/1.1 RFC 7231, Section 6.4.4 |
||
|
HTTP/1.1 RFC 7232, Section 4.1 |
||
|
HTTP/1.1 RFC 7231, Section 6.4.5 |
||
|
HTTP/1.1 RFC 7231, Section 6.4.7 |
||
|
Permanent Redirect RFC 7238, Section 3 (Experimental) |
||
|
HTTP/1.1 RFC 7231, Section 6.5.1 |
||
|
HTTP/1.1 Authentication RFC 7235, Section 3.1 |
||
|
HTTP/1.1 RFC 7231, Section 6.5.2 |
||
|
HTTP/1.1 RFC 7231, Section 6.5.3 |
||
|
HTTP/1.1 RFC 7231, Section 6.5.4 |
||
|
HTTP/1.1 RFC 7231, Section 6.5.5 |
||
|
HTTP/1.1 RFC 7231, Section 6.5.6 |
||
|
HTTP/1.1 Authentication RFC 7235, Section 3.2 |
||
|
HTTP/1.1 RFC 7231, Section 6.5.7 |
||
|
HTTP/1.1 RFC 7231, Section 6.5.8 |
||
|
HTTP/1.1 RFC 7231, Section 6.5.9 |
||
|
HTTP/1.1 RFC 7231, Section 6.5.10 |
||
|
HTTP/1.1 RFC 7232, Section 4.2 |
||
|
HTTP/1.1 RFC 7231, Section 6.5.11 |
||
|
HTTP/1.1 RFC 7231, Section 6.5.12 |
||
|
HTTP/1.1 RFC 7231, Section 6.5.13 |
||
|
HTTP/1.1 Range Requests RFC 7233, Section 4.4 |
||
|
HTTP/1.1 RFC 7231, Section 6.5.14 |
||
|
HTCPCP/1.0 RFC 2324, Section 2.3.2 |
||
|
HTTP/2 RFC 7540, Section 9.1.2 |
||
|
WebDAV RFC 4918, Section 11.2 |
||
|
WebDAV RFC 4918, Section 11.3 |
||
|
WebDAV RFC 4918, Section 11.4 |
||
|
Using Early Data in HTTP RFC 8470 |
||
|
HTTP/1.1 RFC 7231, Section 6.5.15 |
||
|
Additional HTTP Status Codes RFC 6585 |
||
|
Additional HTTP Status Codes RFC 6585 |
||
|
Additional HTTP Status Codes RFC 6585 |
||
|
An HTTP Status Code to Report Legal Obstacles RFC 7725 |
||
|
HTTP/1.1 RFC 7231, Section 6.6.1 |
||
|
HTTP/1.1 RFC 7231, Section 6.6.2 |
||
|
HTTP/1.1 RFC 7231, Section 6.6.3 |
||
|
HTTP/1.1 RFC 7231, Section 6.6.4 |
||
|
HTTP/1.1 RFC 7231, Section 6.6.5 |
||
|
HTTP/1.1 RFC 7231, Section 6.6.6 |
||
|
Transparent Content Negotiation in HTTP RFC 2295, Section 8.1 (Experimental) |
||
|
WebDAV RFC 4918, Section 11.5 |
||
|
WebDAV Binding Extensions RFC 5842, Section 7.2 (Experimental) |
||
|
An HTTP Extension Framework RFC 2774, Section 7 (Experimental) |
||
|
Additional HTTP Status Codes RFC 6585, Section 6 |
In order to preserve backwards compatibility, enum values are also present
in the module in the form of constants. The enum name is
equal to the constant name (i.e. is also available as
).
Changed in version 3.7: Added status code.
New in version 3.8: Added status code.
New in version 3.9: Added , and status codes.